“If you don’t have the time to do it right, when will you have the time to do it again?”
– John Wooden, former UCLA Men’s Basketball Coach and Presidential Medal of Freedom award winner.
We have a few frequently asked questions regarding bin vibrators, many of which revolve around how to install the unit. Here is the down and dirty:
 1. Determine the best location for piston vibrator installation.
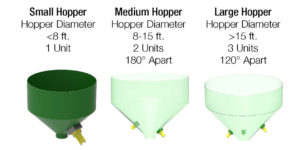
Keep in mind that sometimes multiple vibrators are necessary for proper material flow out of bins and hoppers. It comes down to the diameter of the bin or hopper. If the hopper diameter is less than 8 ft. wide, only one vibratory unit is necessary. Two units will get the job done for medium-sized hoppers that fall within the 8-15 ft. width. Lastly, large hoppers and bins with a diameter greater than 15 ft. require three vibrators.
For multiple vibrator unit installs, placement is critical. Mount the vibrator to the hopper wall 1/3 the distance from the discharge to the top of the sloped wall. Should a second vibrator be necessary, it should be mounted opposite and approximately 1/4 way up the sloped wall. For large hopper applications requiring three vibrators, mount the third vibrator 1/2 way up the sloped wall. The rule of thumb is that a correctly sized vibrator will have an approximate 5ft. radius of influence on material and structure, but when in doubt as to where to install your vibrator, think about where your problem point is and make sure vibration gets to it.
Learn more about why the placement of your vibrator is important by watching the video below.
2. Stitch weld the mounting channel or stiffener plate to the bin wall.
Leave the corners on the mounting medium (channel or plate) free of weld. To learn why check out Craig Macklin’s blog, “Vibrators Don’t Damage Equipment, Wrong Installations Do.”

3. Use the grade 5 fasteners provided by The Cleveland Vibrator Company.
Tighten them down. The VMS, VMSAC, and SI series offer the 4-bolt pattern. This may take an extra few minutes, but it offers twice the support compared to 2-bolt pattern units.
4. Thread the provided port protector or muffler included with the pneumatic vibrator into the exhaust port.
Securely tighten.
5. Loop the safety cable through the hole in the casting.
This step is a precautionary measure. Always put safety first!
6. Now that we’ve completed the vibrator installation, the next topic is the air powering the unit.
- Is the air hose providing enough air to the piston vibrator? Check with a Cleveland Vibrator representative to determine the best NPT fitting and ID of the hose to prevent “choking” the vibrator.
- Is the valve (solenoid, ball, etc.) clean and working correctly? Keep in mind that we recommend having the valve specifically for the vibrator operation installed within 10 ft. of the unit.

- Is the FRL (filter, regulator & lubricator) before the valve? Just like what we suggest for the vibrator, using filtered, regulated, and lubricated air in the valve will also help with the longevity of this component.
- Does the air go through a filter-regulator-lubricator (FRL) before reaching the vibrator? We suggest installing the FRL between the plant airline and the valve specifically for the vibrator. The FRL should be within 10 ft. of the unit.
7. This is how to properly regulate the FRL.
- Filter the air
- Regulate to 20-80 psi
- Use Vibra-Lube or a similar 10W/NR lubricant. We recommend 1-2 drops per minute of operation for piston vibrators 2″ or less in diameter. and 2-3 drops per minute of operation for 3″ and larger diameter piston vibrators.
Performing routine maintenance checks of the vibrator and its working parts is key to success.
Similar to how the grounds crew at Augusta National maintains the golf course every year at the Masters (you know I always love a good golf analogy), the facilities and operators that follow the proper installation procedure will reap the benefits of a long-lasting pneumatic piston vibrator. We certainly understand that not all plant environments are perfect for equipment. Still, if the time is taken to install the air vibrator correctly, the return on investment can certainly be noticed. After spending the time and money on purchasing a material flow aid, be sure to follow the steps to keep it running like a well-oiled machine.
If these quick tips do not answer your questions, please contact us at any time. We are always here to help!

Mike joined The Cleveland Vibrator Company team in 2013 with prior experience in manufacturing sales with a Cleveland company in the tool and die industry. Now, he’s the Director of Sales and specializes in “making stuff that shakes stuff”.
When he’s not immersed in the world of industrial vibration, as rare as that might be, Mike keeps busy *not finishing in last place* in Fantasy Football and enjoys spending time with his wife and three kids. It’s always golf season for Mike, and he’s been known to 3 putt his way around any course and can roll tee balls in rain or shine. You can find him tailgating in the Muni Lot before Browns games or supporting local breweries.
As an avid provider of #VibrationEducation, he offers this free bit of advice, “Not all vibration is the same. Force and frequency do matter!” However, there is a 2% upcharge for all Michigan and Steeler’s fans.
Follow us:
Share this blog post:


 1. Determine the best location for piston vibrator installation.
2 Responses to The Importance of Proper Installation of Industrial Vibrators